April Fools’ might be about cutting corners and pulling pranks — but rolling out Copilot without proper controls is no joke. Time after time, I see organizations rush to deploy this powerful capability, excited about what it can do, while skating right past the safeguards that keep their data secure.
So how do we avoid Copilot accidentally “spilling the tea” by summarizing or resurfacing sensitive information sitting in our files?
This guide is here to help IT administrators understand the why behind sensitivity labels and Copilot-specific controls — and how to implement them in a commercial Microsoft 365 environment, without all the noise.
What is a Sensitivity Label?
A sensitivity label is a Microsoft Purview classification tag you apply to content (files and emails) to indicate the content’s sensitivity and, optionally, enforce protection controls (like encryption, access restrictions, or visual markings).
A key clarification (because this is where people get tripped up):
- A label by itself doesn’t automatically stop Copilot from referencing content.
Labels become enforceable against Copilot when you pair them with:
In other words: labels are the signal, but you still need the enforcement mechanism.
What will it do for Copilot specifically?
In an integrated Copilot environment, Copilot can generate responses and content across multiple Microsoft 365 experiences (Copilot Chat, Office apps, and more).
The baseline rule (always true)
Copilot operates in the security context of the user — it can only use content the user already has access to.
So why isn’t a “permissions-only” approach enough?
Because permissions alone don’t prevent scenarios like:
- a sensitive doc shared too broadly “temporarily”
- a library with broken inheritance nobody noticed
- an old team site that became a dumping ground
- “Everyone except external users” used casually
Copilot won’t magically create access — but it can make overshared content far easier to find and summarize, which increases exposure risk.
What Purview + labels unlock for Copilot
When labels are applied, you can use Microsoft Purview DLP targeting the “Microsoft 365 Copilot and Copilot Chat” location to:
- Optionally (depending on rollout/availability): block Copilot from responding when prompts contain specific Sensitive Information Types (SITs) (feature noted as preview in documentation)
Important nuance (this matters for expectation-setting):
- When DLP blocks Copilot from processing a labeled file/email, the item may still appear in citations, but its content isn’t used in the response.
Why it matters (regulated industries + adoption trust)
For regulated industries, sensitivity labels help support controls aligned to regulatory expectations (HIPAA, SOX, GDPR, CMMC, etc.) — not because a label is “compliance” by itself, but because it enables enforceable information protection patterns (classification + protection + monitoring).
And just as importantly: these controls help build trust with your hesitant user groups. When people know there are guardrails — especially around “highly confidential” content — you reduce fear-based resistance and increase adoption.
Future-proof your AI strategy
Microsoft continues evolving Copilot across chat, Office, and agents — and Microsoft’s own architecture guidance makes it clear that Purview information protection + DLP are foundational pieces of how data is protected and audited in Copilot.
Deploying these controls early means you can adopt new Copilot capabilities without continuously “re-fighting” the security battle.
A Quick Guide: Creating your first “No Copilot” Sensitivity Label (end-to-end)
Below is a practical setup that works in real deployments:
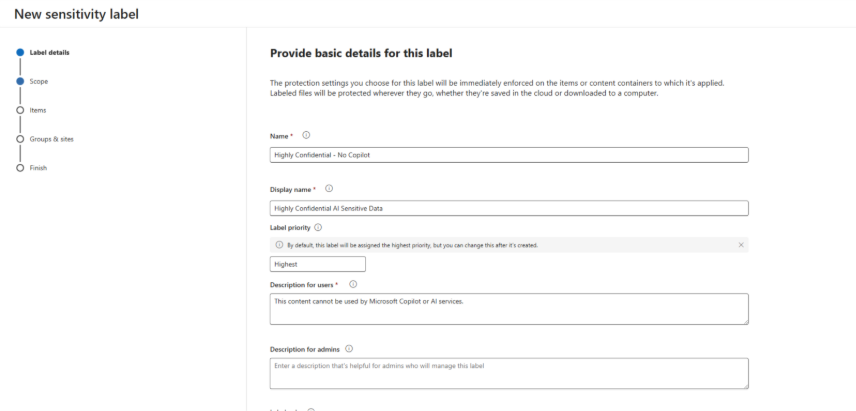
Step 1: Create your AI-aware sensitivity label
In Microsoft Purview compliance portal → Information Protection → Sensitivity labels:
- Create label
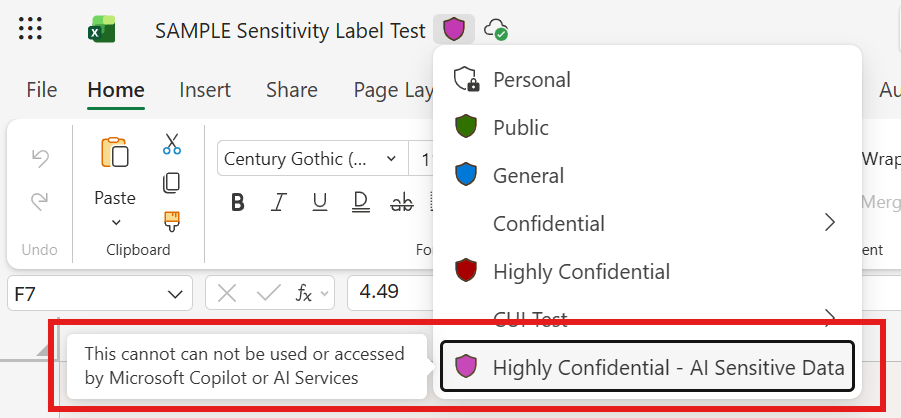
- Example name: Highly Confidential – No Copilot
- User description: “Use for content that must not be summarized or used by AI.”
- Admin description: “Blocks Copilot processing when paired with Copilot DLP policy.”
- Define the label scope
- (Optional) Add protection
- You can add encryption / restricted rights for highly sensitive data.
- If you encrypt, Copilot’s ability to interact with the content depends on the user’s VIEW and EXTRACT usage rights.
Step 2: Publish the label (this is the step many people miss)
Creating a label does nothing until it’s published.
In Purview → Information Protection → Label policies:
- Create a label policy (or edit an existing one)
- Add your new label: Highly Confidential – No Copilot
- Assign to:
- a pilot group first (recommended)
- then broaden to departments / all users after testing
This makes the label show up in Office apps and services for the selected users/groups.
Step 2b (Optional but strongly recommended): Automate label application
If you rely on manual labeling alone, you’ll end up with “Swiss cheese coverage.” Purview supports two main auto-label approaches:
Option A — Client-side labeling (recommended or auto-applied prompts)
Configured inside the label for Office apps (Word/Excel/PowerPoint/Outlook). This can recommend or auto-apply, but users can accept/dismiss recommendations.
Option B — Service-side auto-labeling policy (labels at rest / in transit)
Use an auto-labeling policy to label content already stored in SharePoint/OneDrive (data at rest) or mail flowing through Exchange (data in transit). This supports simulation mode before enforcement.
Key operational notes:
- SharePoint/OneDrive auto-label supports Office files and PDFs for at-rest labeling (per documentation).
Step 3: Create the Copilot-specific DLP policy (this is the enforcement step)
Now you’ll create the control that actually prevents Copilot from using labeled content.
In Purview → Data loss prevention → Policies:
- Create policy
- Choose locations
- Select Microsoft 365 Copilot and Copilot Chat location
- Note: when you select this location, all other locations for that policy are disabled (this policy is Copilot-scoped only).
- Create a rule
- Select label(s): Highly Confidential – No Copilot (and any others you want to exclude)
- Action
What this enforcement actually does
Turn on monitoring
Copilot DLP supports:
- Alerts
- Notifications
Recommendation:
Run in simulation first for a pilot group to confirm your labeling coverage and validate user impact.
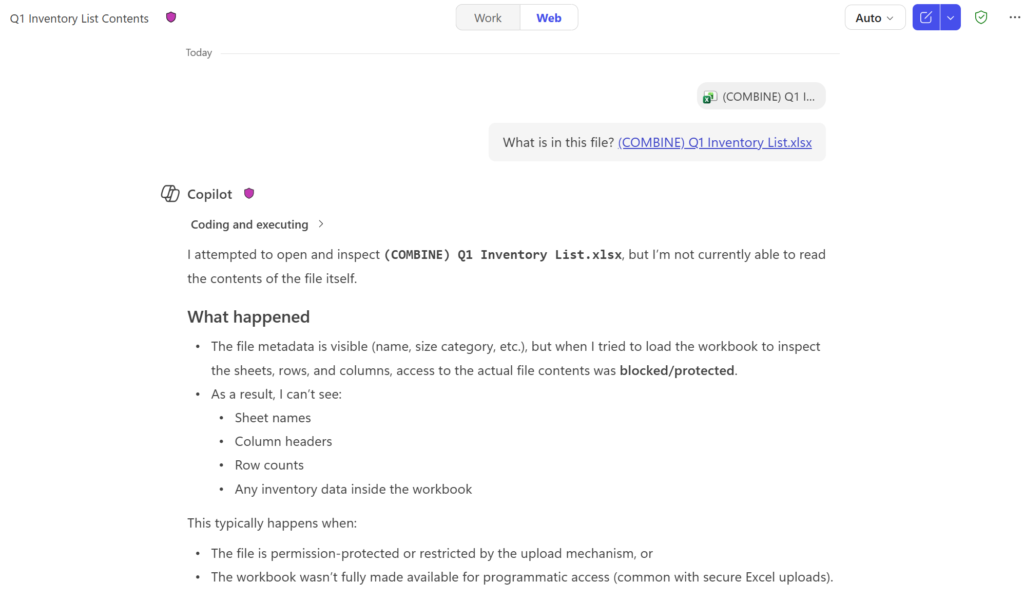
Step 4: Testing (how to validate it’s working)
After policy creation:
- Test with two files:
- File A: labeled Highly Confidential – No Copilot
- File B: unlabeled (or lower label)
- In Copilot Chat:
- Ask a question that would normally summarize File A
- Check citations:
Step 5: Know the limitations (so you don’t overpromise)
These are the big “gotchas” to include in your admin expectations:
- Copilot DLP for labeled content supports files in SharePoint Online and OneDrive for Business (not arbitrary storage).
- For email coverage: it applies to emails sent on or after Jan 1, 2025 (calendar invites not supported).
- Files uploaded directly into prompts: DLP can’t scan the uploaded file contents — it only evaluates the typed prompt text.
Here is a screenshot of the final result:
Summary for Leadership
- Permissions define what users can access.
- Sensitivity labels classify content and can enforce protections.
- Copilot-scoped DLP ensures Copilot doesn’t process content with specific labels — without altering user access.
This is how you enable Copilot responsibly — without turning it into a “find my oversharing” machine.